To begin, download and unzip stock chart package. If you’re seasoned web developer and feeling brave, you could simply go to samples/ folder and analyze html files found there. Otherwise stay on this tutorial.
Setup working folder
Create some folder for your project and copy amcharts folder from downloaded package into it. Then, start with a new HTML file:
<!DOCTYPE HTML>
<html>
    <head>
        <meta http-equiv="content-type" content="text/html; charset=utf-8">
        <title>My first stock chart</title>
    </head>
    <body>
    </body>
</html>
Include required JavaScript and CSS files
To save some kilobytes, since V.3 we split chart js files into logical parts. So with this version, you need to include 3 files in order Stock chart to work. In case you worry about number of requests to your server, simply copy and paste contents of all files into one (important – do it in the same sequance as we include files – amcharts, serial, amstock). Add these lines to the <head> of your HTML:
<script src="amcharts/amcharts.js" type="text/javascript"></script>
<script src="amcharts/serial.js" type="text/javascript"></script>
<script src="amcharts/amstock.js" type="text/javascript"></script>
As we’ll write some script in your HTML, you should also add these lines to the <head> while you’re at it:
<script type="text/javascript">
</script>
Stock chart also uses one CSS file, located in the same folder. You can include it or simply copy/paste contents of style.css to your own CSS file. To include our file, add this line to <head> of the document:
<link rel="stylesheet" href="amcharts/style.css" type="text/css">
Create a container for a chart
Chart should be placed inside a <div>. Add this line to the <body> of HTML and adjust width/height if you want to:
<div id="chartdiv" style="width:100%; height:400px;"></div>
Note, you should give unique id for this <div>.
Start coding JavaScript
You can create the charts in two different ways - using JavaScript API or creating JSON object. In this tutorial we will use first way. In the end of the page you will find the same result made with JSON.
Now it’s time to start writing some JavaScript. You should do it within <script type="text/javascript"> </script> tags in the head of HTML. To ensure all the scripts and HTML is loaded, we’ll use AmCharts.ready handler:
AmCharts.ready(function(){
   alert('page loaded');
});
I added alert for the sole purpose of verifying that AmCharts.ready event is firing up properly. Now, if you open your HTML in the browser, you should get alert window saying “page loaded”. You can remove the line now.
Generate some data for the chart
In real life you’ll probably load data from some file or retrieve it using Ajax. You can check this tutorial on how to load external data or this one, about using PHP to get data from mySQL data base. It’s about Serial chart, but the idea is 100% the same. We’ll not cover this topic here and will simply add some data so you could test your chart and understand what is the structure of chart data.
Chart data is an Array of objects. Each object should contain at least one field with Date object or date string (date strings are supported since V3). And, if you want your chart to display some graph, at least one value field with some numerical value. Below is a most simple example of such object,
with date object:
{date: new Date(2011, 5, 1, 0, 0, 0, 0), value:10}
with date string:
{date: "2013-11-03", value:10}
Notice, Date object in JavaScript uses zero-based months. This means that month “0” is January, 1 – February and so on. So the date in the first example above is 1st of June (not May) of 2011. In case you use date strings, month numbers are the same as in normal life. In case you use date strings, you should tell the chart date format of your dates:
chart.dataDateFormat = "YYYY-DD-MM"
Check this page for more date formats.
In case you have a chance to present data with Date objects, do it – this will improve rendering of a chart. Let’s create some dummy data and add it to chartData array:
var chartData= [
    {date: new Date(2011, 5, 1, 0, 0, 0, 0), val:10},
    {date: new Date(2011, 5, 2, 0, 0, 0, 0), val:11},
    {date: new Date(2011, 5, 3, 0, 0, 0, 0), val:12},
    {date: new Date(2011, 5, 4, 0, 0, 0, 0), val:11},
    {date: new Date(2011, 5, 5, 0, 0, 0, 0), val:10},
    {date: new Date(2011, 5, 6, 0, 0, 0, 0), val:11},
    {date: new Date(2011, 5, 7, 0, 0, 0, 0), val:13},
    {date: new Date(2011, 5, 8, 0, 0, 0, 0), val:14},
    {date: new Date(2011, 5, 9, 0, 0, 0, 0), val:17},
    {date: new Date(2011, 5, 10, 0, 0, 0, 0), val:13}
];
Create chart object
Now, let’s go back to our onload handler and create a main chart object:
var chart = new AmCharts.AmStockChart();
As chart uses some images, we should indicate path to the images:
chart.pathToImages = "amcharts/images/";
Create a Data Set
Stock chart must have at least one data set. Data set is an object which main purpose is to tell the chart how the data in data provider should be treated. In case you have multiple data sets, your users will be able to choose which of them should be displayed, also compare one data set to another. This is quite common practice in stock charts. Here is an example of stock chart with multiple data sets. We’ll start with one data set:
var dataSet = new AmCharts.DataSet();
First, we set our chartData variable as a dataProvider of this data set:
dataSet.dataProvider = chartData;
Next, we have to tell the data set what are the names of fields in your data provider and give new or the same names which will be used later.
You might ask “why can’t we always use the same names as they are in data provider?”. The answer is simple. Let’s say you have two data sets but want to have only one data provider for both of them. In this case you’ll have fields like "value1" and "value2" in your data provider and you’ll map both these values to the same name.
DataSet object has fieldMappings property which accepts array of objects. Example of such object is below:
{fromField:"a", toField:"b"}
We have "val" in our data provider and it’s the only one value field we need to match:
dataSet.fieldMappings = [{fromField:"val", toField:"value"}];
We intentionally chose different names for fromField and toField so you could notice the difference later. Both these names can be any strings, it’s up to you how you name them. In case you’d have two value fields in your data provider, simply add another object to the array, for example:
dataSet.fieldMappings = [{fromField:"val", toField:"value"}, {fromField:"vol", toField:"volume"}];
Next, we have to tell data set which field in data provider is a category field. Category field of stock chart’s data should always contain date object or date string. Name of such field in our dataProvider is date, so we set:
dataSet.categoryField = "date";
You can also set tile, color and some other properties for data set. Check the full list in DataSet class reference.
Lastly, we pass array of data sets to the chart:
chart.dataSets = [dataSet];
Create a stock panel
Stock chart can have one or more panels. You could also call these panels "charts", but we call them panels in order not to mix with stock chart. These panels have the same category (date) axis and separate value axes.
This is example of stock chart with one panel and this one has two panels.
OK, let’s create one first:
var stockPanel = new AmCharts.StockPanel();
and pass array of panels to the chart:
chart.panels = [stockPanel];
StockPanel is a class which extends AmSerialChart. So it can do everything this class can and some more things. Check StockPanel and AmSerialChart class references to see all the properties and methods they support. However don’t hurry to set all these properties on individual panels - as Stock chart can have multiple panels, and most of the settings will be the same for all panels, there is a separate class, PanelsSettings which you should use in order to control the look and behavior of your panels. For example:
var panelsSettings = new AmCharts.PanelsSettings();
panelsSettings.startDuration = 1;
chart.panelsSettings = panelsSettings;
The lines above will make the duration of initial animation equal to 1 second.
Create a graph
Panel should have at least one graph in order to display something. Let’s create stock graph:
var graph = new AmCharts.StockGraph();
StockGraph is a class which extends AmGraph class. The most important thing graph should know is the name of the field in your data set which it should use for it’s values. Scroll a bit up to check the part about field mappings. We have only one of them:
{fromField:"val", toField:"value"}
we should use the name we set for toField:
graph.valueField = "value";
Next, we should set graph type. Default graph type is "line", but let’s set it to "column":
graph.type = "column";
Possible graph types are "line", "column", "step", "smoothedLine", "candlestick" and "ohlc". Note, that if you set type to "candlestick" or "ohlc" you should have at least 4 value fields in your data provider and set openField, closeField, highField and lowField for your graph.
As we don’t want our columns to be transparent, we should set:
graph.fillAlphas = 1;
Let’s give our graph a title:
graph.title = "Value"
Finally, we should add this graph to the panel:
stockPanel.addStockGraph(graph);
Now we reached a place where we can finally test our script ant see the result. We should call write method to do this and pass id of a chart’s div:
chart.write("chartdiv");
And here is full source of what we’ve done so far:
<!DOCTYPE HTML>
<html>
    <head>
        <meta http-equiv="content-type" content="text/html; charset=utf-8">
        <title>My first stock chart</title>
        <link rel="stylesheet" href="amcharts/style.css" type="text/css">

        <script src="amcharts/amcharts.js" type="text/javascript"></script>
        <script src="amcharts/serial.js" type="text/javascript"></script>
        <script src="amcharts/amstock.js" type="text/javascript"></script>

        <script type="text/javascript">

            var chartData = [
                {date: new Date(2011, 5, 1, 0, 0, 0, 0), val:10},
                {date: new Date(2011, 5, 2, 0, 0, 0, 0), val:11},
                {date: new Date(2011, 5, 3, 0, 0, 0, 0), val:12},
                {date: new Date(2011, 5, 4, 0, 0, 0, 0), val:11},
                {date: new Date(2011, 5, 5, 0, 0, 0, 0), val:10},
                {date: new Date(2011, 5, 6, 0, 0, 0, 0), val:11},
                {date: new Date(2011, 5, 7, 0, 0, 0, 0), val:13},
                {date: new Date(2011, 5, 8, 0, 0, 0, 0), val:14},
                {date: new Date(2011, 5, 9, 0, 0, 0, 0), val:17},
                {date: new Date(2011, 5, 10, 0, 0, 0, 0), val:13}
            ];

            AmCharts.ready(function() {
                var chart = new AmCharts.AmStockChart();
                chart.pathToImages = "amcharts/images/";

                var dataSet = new AmCharts.DataSet();
                dataSet.dataProvider = chartData;
                dataSet.fieldMappings = [{fromField:"val", toField:"value"}];
                dataSet.categoryField = "date";
                chart.dataSets = [dataSet];

                var stockPanel = new AmCharts.StockPanel();
                chart.panels = [stockPanel];

                var panelsSettings = new AmCharts.PanelsSettings();
                panelsSettings.startDuration = 1;
                chart.panelsSettings = panelsSettings;

                var graph = new AmCharts.StockGraph();
                graph.valueField = "value";
                graph.type = "column";
                graph.fillAlphas = 1;
                graph.title = "MyGraph";
                stockPanel.addStockGraph(graph);

                chart.write("chartdiv");
            });
        </script>
    </head>
    <body>
        <div id="chartdiv" style="width:100%; height:400px;"></div>
    </body>
</html>
Now open your HTML in browser. This is what you should see:
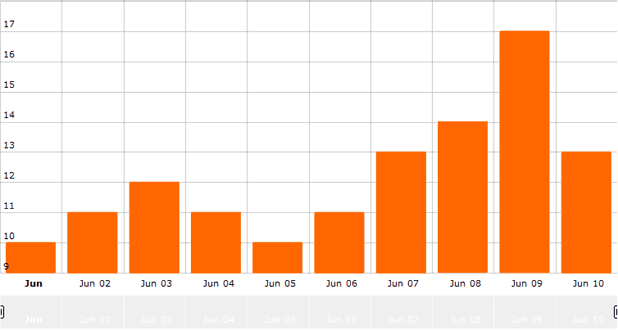
From now on you can test your script after each step you make. Don’t forget to keep chart.write("chartdiv"); line in the bottom of your script.
What if I have hourly data?
In the example above we had one value every day. What if your data changes every hour. Let’s modify data provider a bit – change days to the same date and change hour value for every date object:
var chartData= [
    {date: new Date(2011, 5, 1, 10, 0, 0, 0), val:10},
    {date: new Date(2011, 5, 1, 11, 0, 0, 0), val:11},
    {date: new Date(2011, 5, 1, 12, 0, 0, 0), val:12},
    {date: new Date(2011, 5, 1, 13, 0, 0, 0), val:11},
    {date: new Date(2011, 5, 1, 14, 0, 0, 0), val:10},
    {date: new Date(2011, 5, 1, 15, 0, 0, 0), val:11},
    {date: new Date(2011, 5, 1, 16, 0, 0, 0), val:13},
    {date: new Date(2011, 5, 1, 17, 0, 0, 0), val:14},
    {date: new Date(2011, 5, 1, 18, 0, 0, 0), val:17},
    {date: new Date(2011, 5, 1, 19, 0, 0, 0), val:13}
];
If you open the chart in browser now, you will see only one column. This happened because chart needs to know what is the minimum period of your data. We didn’t set it before, as default minimum period is day.
To set it, we have to create CategoryAxesSettings object and set minPeriod property to "hh" (hours):
var categoryAxesSettings = new AmCharts.CategoryAxesSettings();
categoryAxesSettings.minPeriod = "hh";
chart.categoryAxesSettings = categoryAxesSettings;
Now the chart should properly display all 10 columns. In next steps we’ll continue working with daily data, so you won’t find this line there.
What if I have gaps in my data but don’t want to display them?
Let’s say you don’t have data for weekends, only for workdays. And you don’t want gaps to be displayed in the chart. All you need to do is to set
categoryAxesSettings.equalSpacing = true;
Try to delete couple of data objects from your data provider and check the difference of how the chart will look with equalSpacing set to true and to false.
Adjusting look of axes and grids
In the previous step we introduced CategoryAxesSettings class. If you check the reference, you'll see lot's of properties which you can use to control the look of your category axis. The look of value axes can be controlled via ValueAxesSettings class. For example, let’s make all the grid lines dashed:
var categoryAxesSettings = new AmCharts.CategoryAxesSettings();
categoryAxesSettings.dashLength = 5;
chart.categoryAxesSettings = categoryAxesSettings;

var valueAxesSettings = new AmCharts.ValueAxesSettings();
valueAxesSettings .dashLength = 5;
chart.valueAxesSettings  = valueAxesSettings;
If you open your HTML in browser you should see all the grid lines dashed.
Displaying graph in the scrollbar
As you most likely noticed, the scrollbar displayed in the bottom of the chart is currently empty. And in most of our examples it contains a graph. To set a graph to the scrollbar you should create ChartScrollbarSettings object and tell which of your graphs should be displayed there:
var chartScrollbarSettings = new AmCharts.ChartScrollbarSettings();
chartScrollbarSettings.graph = graph;
chartScrollbarSettings.graphType = "line";
chart.chartScrollbarSettings = chartScrollbarSettings;
Note, as we have only one graph with the same variable name, we set chartScrollbarSettings.graph = graph; If you gave a different variable name for your graph, let’s say myGraph, then you should set: chartScrollbarSettings.graph = myGraph; You can also use graph's id instead of a reference to the object itself (this is useful if you are working with JSON).
We also changed graphType to "line", as it’s quite common that graphs in scrollbars are line (or area) graphs. If you don’t set graphType, same graph type as your graph’s will be used.
Check reference of ChartScrollbarSettings to see all the available properties which will help you to change the look and behavior of your scrollbar.
Adding a legend to the panel
Most likely you noticed that our panel doesn’t display values anywhere. We can add a StockLegend to our panel in order to display the values. StockLegend extends AmLegend class and can do everything this class can. Let’s add the legend:
var legend = new AmCharts.StockLegend();
stockPanel.stockLegend = legend;
Now values will be displayed in the legend as you will roll-over the chart.
Displaying values in a tool-tip
Instead of displaying values in the legend, you might want to display them in the tool-tip (balloon). There is a class ChartCursorSettings which is responsible for turning this feature on. Here is how we do it:
var chartCursorSettings = new AmCharts.ChartCursorSettings();
chartCursorSettings.valueBalloonsEnabled = true;
chart.chartCursorSettings = chartCursorSettings;
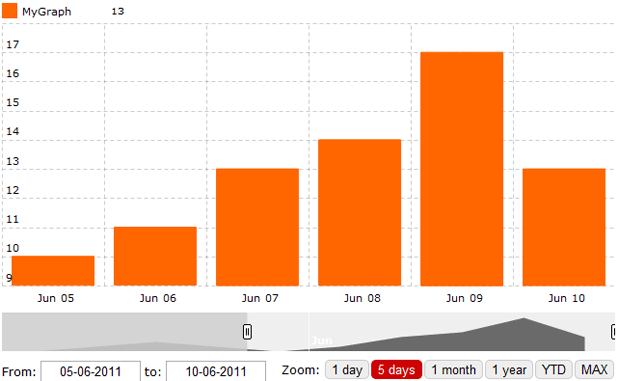
Adding a period selector
All our examples on a web site have some buttons which enable selecting predefined periods, also date input fields. In order to add it, you should create PeriodSelector object and add it to the chart:
var periodSelector = new AmCharts.PeriodSelector();
chart.periodSelector = periodSelector;
If you view your HTML in browser, you will see only date input fields. Let’s add some period buttons to the selector:
periodSelector.periods = [
   {period:"DD", count:1, label:"1 day"},
   {period:"DD", selected:true, count:5, label:"5 days"},
   {period:"MM", count:1, label:"1 month"},
   {period:"YYYY", count:1, label:"1 year"},
   {period:"YTD", label:"YTD"},
   {period:"MAX", label:"MAX"}
];
Now you should see buttons with periods we specified. As you see, periods accept array of objects. Each of the object should have at least period and label properties. Most of them should also contain count (except with "MAX" and "YTD" periods). If you want one of these periods to be selected when the chart is displayed for the first time, you should add selected:true property to the period object.
The end
We covered most important things you should know when creating stock chart. In next tutorial we’ll explain how to work with multiple data sets and how they can be compared. And below is full source of the HTML we produced. Even more – you can edit this chart in jsFiddle.
<!DOCTYPE HTML>
<html>
    <head>
        <meta http-equiv="content-type" content="text/html; charset=utf-8">
        <title>My first stock chart</title>
        <link rel="stylesheet" href="amcharts/style.css" type="text/css">

        <script src="amcharts/amcharts.js" type="text/javascript"></script>
        <script src="amcharts/serial.js" type="text/javascript"></script>
        <script src="amcharts/amstock.js" type="text/javascript"></script>

        <script type="text/javascript">

            var chartData= [
                {date: new Date(2011, 5, 1, 0, 0, 0, 0), val:10},
                {date: new Date(2011, 5, 2, 0, 0, 0, 0), val:11},
                {date: new Date(2011, 5, 3, 0, 0, 0, 0), val:12},
                {date: new Date(2011, 5, 4, 0, 0, 0, 0), val:11},
                {date: new Date(2011, 5, 5, 0, 0, 0, 0), val:10},
                {date: new Date(2011, 5, 6, 0, 0, 0, 0), val:11},
                {date: new Date(2011, 5, 7, 0, 0, 0, 0), val:13},
                {date: new Date(2011, 5, 8, 0, 0, 0, 0), val:14},
                {date: new Date(2011, 5, 9, 0, 0, 0, 0), val:17},
                {date: new Date(2011, 5, 10, 0, 0, 0, 0), val:13}
            ];

            AmCharts.ready(function() {
                var chart = new AmCharts.AmStockChart();
                chart.pathToImages = "amcharts/images/";

                var dataSet = new AmCharts.DataSet();
                dataSet.dataProvider = chartData;
                dataSet.fieldMappings = [{fromField:"val", toField:"value"}];
                dataSet.categoryField = "date";
                chart.dataSets = [dataSet];

                var stockPanel = new AmCharts.StockPanel();
                chart.panels = [stockPanel];

                var legend = new AmCharts.StockLegend();
                stockPanel.stockLegend = legend;

                var panelsSettings = new AmCharts.PanelsSettings();
                panelsSettings.startDuration = 1;
                chart.panelsSettings = panelsSettings;

                var graph = new AmCharts.StockGraph();
                graph.valueField = "value";
                graph.type = "column";
                graph.title = "MyGraph";
                graph.fillAlphas = 1;
                stockPanel.addStockGraph(graph);

                var categoryAxesSettings = new AmCharts.CategoryAxesSettings();
                categoryAxesSettings.dashLength = 5;
                chart.categoryAxesSettings = categoryAxesSettings;

                var valueAxesSettings = new AmCharts.ValueAxesSettings();
                valueAxesSettings .dashLength = 5;
                chart.valueAxesSettings  = valueAxesSettings;

                var chartScrollbarSettings = new AmCharts.ChartScrollbarSettings();
                chartScrollbarSettings.graph = graph;
                chartScrollbarSettings.graphType = "line";
                chart.chartScrollbarSettings = chartScrollbarSettings;

                var chartCursorSettings = new AmCharts.ChartCursorSettings();
                chartCursorSettings.valueBalloonsEnabled = true;
                chart.chartCursorSettings = chartCursorSettings;

                var periodSelector = new AmCharts.PeriodSelector();
                periodSelector.periods = [{period:"DD", count:1, label:"1 day"},
                                          {period:"DD", selected:true, count:5, label:"5 days"},
                                          {period:"MM", count:1, label:"1 month"},
                                          {period:"YYYY", count:1, label:"1 year"},
                                          {period:"YTD", label:"YTD"},
                                          {period:"MAX", label:"MAX"}];
                chart.periodSelector = periodSelector;

                chart.write("chartdiv");
            });
        </script>
    </head>
    <body>
        <div id="chartdiv" style="width:100%; height:400px;"></div>
    </body>
</html>
And the final result should be this:
P.S. And here is how your JavaScript should look like if you'd like to have the same chart made with JSON config instead of JavaScript API:
AmCharts.makeChart("chartdiv", {
    type: "stock",
    pathToImages: "amcharts/images/",
    dataDateFormat: "YYYY-MM-DD",
    dataSets: [{
        dataProvider: [{
            date: "2011-06-01",
            val: 10
        }, {
            date: "2011-06-02",
            val: 11
        }, {
            date: "2011-06-03",
            val: 12
        }, {
            date: "2011-06-04",
            val: 11
        }, {
            date: "2011-06-05",
            val: 10
        }, {
            date: "2011-06-06",
            val: 11
        }, {
            date: "2011-06-07",
            val: 13
        }, {
            date: "2011-06-08",
            val: 14
        }, {
            date: "2011-06-09",
            val: 17
        }, {
            date: "2011-06-10",
            val: 13
        }],
        fieldMappings: [{
            fromField: "val",
            toField: "value"
        }],
        categoryField: "date"
    }],

    panels: [{

        legend: {},

        stockGraphs: [{
            id: "graph1",
            valueField: "value",
            type: "column",
            title: "MyGraph",
            fillAlphas: 1
        }]
    }],

    panelsSettings: {
        startDuration: 1
    },

    categoryAxesSettings: {
        dashLength: 5
    },

    valueAxesSettings: {
        dashLength: 5
    },

    chartScrollbarSettings: {
        graph: "graph1",
        graphType: "line"
    },

    chartCursorSettings: {
        valueBalloonsEnabled: true
    },

    periodSelector: {
        periods: [{
            period: "DD",
            count: 1,
            label: "1 day"
        }, {
            period: "DD",
            selected: true,
            count: 5,
            label: "5 days"
        }, {
            period: "MM",
            count: 1,
            label: "1 month"
        }, {
            period: "YYYY",
            count: 1,
            label: "1 year"
        }, {
            period: "YTD",
            label: "YTD"
        }, {
            period: "MAX",
            label: "MAX"
        }]
    }
});