The purpose of this article is to give you a high-level overview of what amCharts 4 Editor is and how it works. After going through this article you should understand the steps required to integrate the Editor into your web app.
Editor Architecture
amCharts 4 Editor was architected to make integration into your applications both seamless and trouble-free. The Editor is a pretty big application in and of itself. We didn’t want it to interfere or conflict with anything that you do in your app, and we didn’t want to add anything to the “weight” of your app in parts where the Editor isn’t needed.
That’s why we decided to separate the Editor into two distinct parts: Editor library and Editor app.
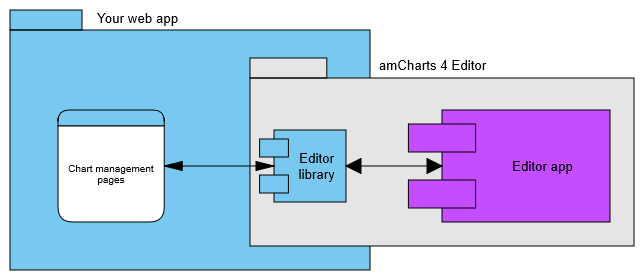
Editor "app"
Editor app is the heart of its functionality. Everything that the Editor can do for you is done in the Editor app. It’s a big project with a lot going on - it has to know about almost every type and property in the amCharts charting library that you may want to edit, it has to provide meaningful editors for different property types, help you edit the data and generate the code. It is a self-contained app and can run on its own as a standalone chart configurator.
The Editor app is included in the Editor package but is very loosely coupled with your web application. Which brings us to the Editor library.
Editor library
Editor library is the glue between your app and the Editor app. It enables you to open the Editor app from within your web application, pass settings, chart configuration, and data to it, and receive the editing results back. It is lightweight and doesn’t affect the size of your bundles or your app’s performance.
JSON-first
There are two distinct ways to create charts with amCharts 4: object-based approach and JSON-based approach.
Object-based is ideal for developers creating charts “by hand” as it enables code-completion, type-checking, and an overall nicer API for the modern web development environments. On the other hand, it is not easily serializable and is not really suitable for environments where chart configurations need to be saved, edited, and restored outside of the development tools. That’s where the JSON-based approach shines. While it is not as elegant and harder for developers to maintain, it is ideal for saving chart configurations in databases, file systems, or cloud services.
The core purpose of the amCharts 4 Editor aligns with the JSON-first approach just perfectly. That’s why the Editor is based around JSON chart configurations for amCharts 4.
The Editor can generate object-based chart configurations with a primary purpose of enabling developers to quickly jumpstart complex visualizations in the Editor and then continue working on them in code. Object-based code generation is a one-way operation (at least at this stage).
Requirements and Browser Support
As a developer, you should be able to use amCharts 4 Editor in any modern web development environment and with any framework of your choice. The package includes samples for “vanilla” JavaScript, React, Vue, and Angular, but the use is, obviously, not limited to those.
On the client-side, at this stage we aim to support all actively maintained browsers (as of 2020). This means that, at least in the preview stage, we are not testing on Internet Explorer or the “classic” version of Microsoft Edge. Please get in touch with us if support for these or other legacy browsers is crucial for you.
Desktop-first
amCharts 4 Editor is a power-user tool meant for in-depth configuration of charts. At this stage, we are focusing on the user experience of power users working on desktop and laptop computers. We will consider implementing a “lighter” UI at a later stage.
Installation
amCharts 4 Editor is available through several channels.
npm/yarn (recommended)
To install with npm or yarn use the official @amcharts/editor4 npm package.
npm install @amcharts/editor4
or
yarn add @amcharts/editor4
Download
Download a standalone archive (coming soon) if you plan to use the Editor in an environment that doesn’t support npm packages or if you have other reasons.
CDN (not recommended)
amCharts 4 Editor is a substantial package and is best served from the same location as the rest of your application. We don’t recommend serving it from our servers and don’t offer an SLA for doing so. Having said that, you may want to use it remotely for a quick test. In this case, we recommend using a service such as unpkg to load the Editor library from the remote npm package:
<script src="https://unpkg.com/@amcharts/editor4/editor.js"></script>
You will also need to specify the remote Editor’s app location when launching the Editor from code (more on this in a separate article).
Working with TypeScript / ES2015+ and Bundlers
This section describes the basic steps to get the Editor working in your app that is using a modern version of JavaScript or TypeScript and bundlers, such as webpack, rollup, and alike. If you aren’t using some or any of these, please scroll down to the “plain” JavaScript section.
Setting up copying of the Editor “app”
The Editor app is not bundled with your code as it is a fairly large standalone application. For this reason, you need to configure your build process to copy the am4editor directory from the Editor’s npm package into a location that will end up in the output of your build.
A simple way to do this is to use ncp package to copy the files before the build. For example, our React demo does just that with modified scripts in package.json that look like this:
"copy-editor": "ncp ./node_modules/@amcharts/editor4/am4editor ./public/am4editor",
"start": "yarn copy-editor && react-scripts start",
"build": " yarn copy-editor && react-scripts build",
Notice that before the standard Create React App build commands are called, we execute a copy-editor script which uses ncp to copy the am4editor directory into the public directory of our project. Everything from that directory ends up in the final output of the build process.
Alternatively, you can configure the bundler itself to perform the copying during build. For an example of that approach, check out our Vue sample.
Import the Editor module into your code
Something like this:
// import Editor Launcher
import * as am4editor from '@amcharts/editor4';
And you should be ready to launch it.
Launching the Editor
These are 3 easy steps to launching the Editor from your app.
- Create an instance of the
EditorLauncherclass
const launcher = new am4editor.EditorLauncher();
You can pass an instance of ILauncherConfig to the constructor to customize it but for this simplest example let’s go with the defaults.
- add the handlers for two of the Editor’s events:
saveandclose:
launcher.addEventListener('save', this.renderChart);
launcher.addEventListener('close', () => {
    if (launcher) {
         launcher.close();
    }
});
This is all we need to properly set the editor up with the default settings.
- Now all is left is to call the
launch()method:
launcher.launch();
You can pass an existing chart configuration to launch() if you want to edit an existing chart. Otherwise, your user will be creating a new one.
Handling editing results
Obviously, unless you are just launching the Editor for an ad-hoc chart scaffolding to be used outside of your application, you would want to get the editing results and handle them according to your needs.
Your save event handler receives an argument of type ILauncherEventArguments. There’s more to it than just the edited chart configuration but we will stop at that in this basics tutorial. Check out the reference for ILauncherEventArguments for other things you can get with it.
The most important part for us is the event.chartConfig object holding the configuration for the chart our user created. Here’s a simple way to handle it:
renderChart(event?: am4editor.ILauncherEventArguments) {
    if (event) {
        // close the launcher window
        if (this.launcher) {
            this.launcher.close();
        }
        // render chart and save a reference to it in a class variable
        this.chart = am4core.createFromConfig(event.chartConfig, document.getElementById(‘chartdiv’));
    }
}
Practical samples
For practical demos of using amCharts 4 Editor in a TypeScript-based application check out our Vue and Angular samples. For a ES2015 demo refer to the React sample.
Working with “plain” JavaScript
This section covers a simple usage scenario for web apps not using any bundlers and written in pure JavaScript.
Including required files
Download amCharts 4 Editor files (coming soon) and extract them to the root directory of your app. The am4editor directory contains the Editor app files. It can be placed anywhere within your app’s directory structure but by default Editor expects to find it in /am4editor.
Next, you’ll need the editor.js file included in the package. Place it wherever you place your JavaScript code and include it in your HTML file:
<script src="/editor.js"></script>
Launching the Editor
Editor objects are exposed under the am4editor global.
These are 3 easy steps to launching the Editor from your app.
- Create an instance of the
EditorLauncher:
let launcher = new am4editor.EditorLauncher();
You can pass editor launcher configuration to the constructor to customize it but for this simplest example let’s go with the defaults.
- add the handlers for two of the Editor’s events:
saveandclose:
launcher.addEventListener('save', renderChart);
launcher.addEventListener('close', () => {
    if (launcher) {
         launcher.close();
    }
});
This is all we need to properly set the editor up with the default settings.
- Now all is left is to call the
launch()method:
launcher.launch();
Handling editing results
Obviously, if you are not just launching the Editor for an ad-hoc chart scaffolding to be used outside of your application, you would want to get the editing results and handle them according to your needs.
Your save event handler receives an event argument. There’s more to it than just the edited chart configuration but we will stop at that in this basics tutorial. Check out the reference for ILauncherEventArguments for other things you can get with it.
The most important part for us is the event.chartConfig object holding the configuration for the chart our user created. Here’s a simple way to handle it:
function renderChart(event) {
    if (event) {
        // close the launcher window
        if (launcher) {
            launcher.close();
        }
        // render chart and save a reference to it
        let chart = am4core.createFromConfig(event.chartConfig, document.getElementById(‘chartdiv’));
    }
}
Practical samples
You can find a realistic implementation of amCharts 4 Editor in a “vanilla” JavaScript application in our JavaScript sample.
Wrapping up
These are the basic steps to integrate amCharts 4 Editor into your web application. Use the links on the left to read more in-depth walkthroughs for various technologies, features, and concepts.