Like its real-life counterparts amCharts 4 containers are used to store stuff. Unlike its real-life counterparts our containers can organize, size and arrange stuff in it themselves. This article explains how you can organize just about anything using powerful amCharts 4 layouting engine.
What are Containers?
Objects in amCharts 4 can either be simple elements (a label, a geometrical shape, image) or a complex element which can contain other elements. This tutorial is about the latter. We call them "Containers".
Containers may come in a lot forms and be an object of a lot of classes, but they all inherit from Container.
Containers can be complex or really simple. A Button is a basic Container that holds label and (optionally) an image. An XYChart is a complex Container that holds tens of other Containers and elements.
Any object that inherits from Sprite - which basically means any object in the amCharts 4 universe - can be added to a Container. Container itself inherits from Sprite, hence can be added as a child to other Container.
This makes amCharts 4 so powerfully flexible.
Creating containers
When we create an object that inherits from a Container class, we automatically "create a container". For example, when we instantiate a chart using the am4core.create() function, we also create a chart container.
We can create an empty container of type Container. In fact, that's what we are going to do for most of the examples in this article.
Let's do it now:
let container = am4core.create("container", am4core.Container);
container.width = am4core.percent(100);
container.height = am4core.percent(100);
var container = am4core.create("container", am4core.Container);
container.width = am4core.percent(100);
container.height = am4core.percent(100);
var container = am4core.createFromConfig({
  "width": "100%",
  "height": "100%"
}, "container", am4core.Container);
This by itself does not do much, but we now have a central Container element that we can use to add other stuff to.
MORE INFO This process is exactly the same as with creating chart instances. If you are not yet familiar with it, go read our "Getting Started: Basics" tutorial, now.
Here's a working example of the above, by the way:
See the Pen amCharts 4: Containers (1) by amCharts (@amcharts) on CodePen.
Adding elements to Container
There are a few ways to add elements to a Container. Let's explore them.
Assigning elements to Container
Assigning an element to a Container is as simple as setting elements parent property to the Container's reference.
So, if we want to create and add a Rectangle we would do something like this:
let rect = new am4core.Rectangle();
rect.parent = container;
var rect = new am4core.Rectangle();
rect.parent = container;
In JSON it goes a bit different. We would need to provide instructions in Container's children array:
{
  // ...
  "children": [{
    "type": "Rectangle"
  }]
}
Creating elements in Container
Another option is use Container's own createChild(type) method.
This method accepts a reference to a class definition of the object type we are going to create, instantiates the object, assigns it to Container, and returns the new object. All in one go.
Since this method saves us a few lines of code, we're going to be using it a lot here, in this article.
Let's see how we can rewrite the previous example using a new method we just learned:
let rect = container.createChild(am4core.Rectangle);
var rect = container.createChild(am4core.Rectangle);
See? Just one line of code, like we promised.
Once the createChild() returns the instance to our new object, we can use it to further configure as we see fit.
For example, we probably want to set Rectangle's size and coloring:
let rect = container.createChild(am4core.Rectangle);
rect.width = 100;
rect.height = 100;
rect.fill = am4core.color("red");
var rect = container.createChild(am4core.Rectangle);
rect.width = 100;
rect.height = 100;
rect.fill = am4core.color("red");
{
  // ...
  "children": [{
    "type": "Rectangle",
    "width": 100,
    "height": 100,
    "fill": "red"
  }]
}
See the Pen amCharts 4: Containers (2) by amCharts (@amcharts) on CodePen.
Congratulations! You have added a simple geometrical shape to a Container. A small step for... you know how it goes.
Container layouts
When you add elements to a Container, they are automatically arranged, sized and ordered according to Container's layout rules.
Let's explore how different types of layout affect arrangement of elements.
Layout types
As you saw in our previous example, an element we added appeared in the upper-left corner of the Container, or as we know it "coordinates 0,0".
What would happen if we added a few other elements? Let's create a loop to create six squares.
let colors = new am4core.ColorSet();
for (let i = 0; i < 6; i++) {
  let rect = container.createChild(am4core.Rectangle);
  rect.width = 100;
  rect.height = 100;
  rect.fill = colors.next();
}
var colors = new am4core.ColorSet();
for (var i = 0; i < 6; i++) {
  var rect = container.createChild(am4core.Rectangle);
  rect.width = 100;
  rect.height = 100;
  rect.fill = colors.next();
}
See the Pen amCharts 4: Containers (3) by amCharts (@amcharts) on CodePen.
The code above uses ColorSet (which is a tool to create sequences of distinctive colors) to create six distinctly-colored squares.
However, you see just one. That's because by default a Container has no layout, so the elements are plopped over each other. Container makes no effort in arranging the elements in any way.
If we want Container to do some ordering for us, we use its layout property.
Here's the list of available values:
| Setting | Comment | Example |
|---|---|---|
"absolute" (default) |
Does not arrange elements in any specific way, but they still can be aligned using their respective align property, or positioned with their x and y. |
 |
"grid" |
Elements are arranged into a "grid": placed from left to right, until the edge of the container, then line wraps and begins a new one. | 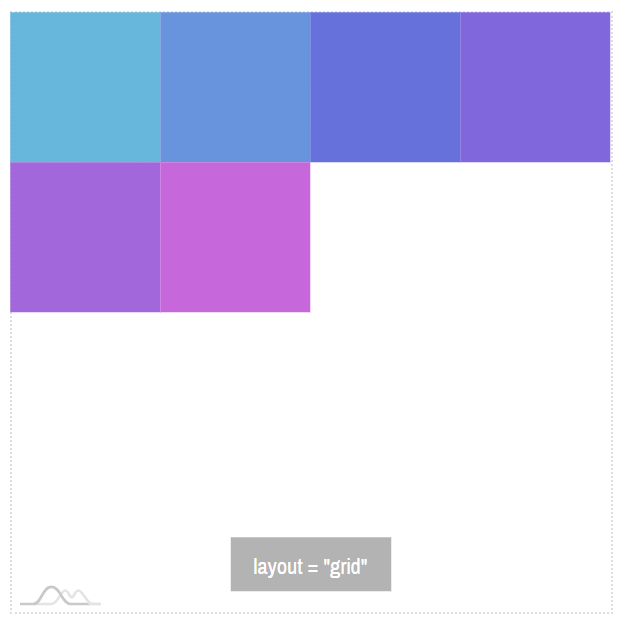 |
"horizontal" |
Elements are arranged horizontally, from left to right. Will not wrap into a new line if they do not fit. | 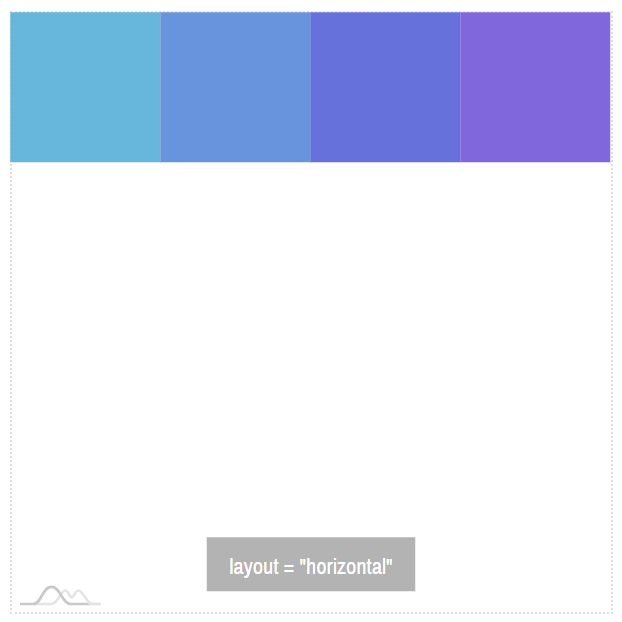 |
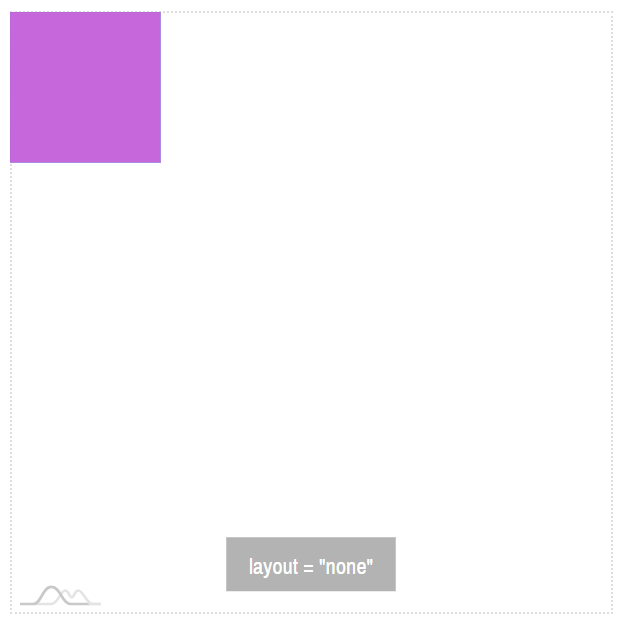
"none" |
Same as "absolute", except individual element alignment is ignored. They can still be positioned using their x and y properties. |
 |
"vertical" |
Elements are arranged vertically. |  |
Element sizing
Normally, if we don't set any sizing to an element in amCharts 4 it will try to be as small as possible. For simple shapes like rectangle, it means it will be invisible at dimensions 0 by 0 pixels.
For more complex elements like Label or Button it will be sized to fit the actual text in it. The width and height will be calculated automatically.
We can set the size of the element manually, using either absolute dimensions in pixels, or dimensions relative to parent Container's size. We'll explore both of those shortly.
Fixed size vs. relative
So far we have been dealing with only fixed sizing of elements. This means that we were setting width and height of our test rectangles in numeric pixel value.
When we set element's dimensions in fixed pixels, the Container does not interfere. It assumes we know what we're doing and that we know rectangles absolutely have to be 100 by 100 pixels.
That size is taken into account when elements are arranged. However it does not guarantee that our elements will necessarily fit into the Container, or will not overlap.
This brings us to a relative element sizing.
To set a relative element size, we set its width and/or height property to a value of type Percent. We can produce such object using handy utility function: am4core.percent(percentvalue).
The relative width or height is relative to the size of the Container. Meaning that setting rectangle's width to say 50% would make it 200px wide, provided our Container's width is 400px.
Let's see how it affects layout and size of our rectangles, when we use relative sizing:
let colors = new am4core.ColorSet();
for (let i = 0; i < 6; i++) {
  let rect = container.createChild(am4core.Rectangle);
  rect.width = am4core.percent(50);
  rect.height = 50;
  rect.fill = colors.next();
}
var colors = new am4core.ColorSet();
for (var i = 0; i < 6; i++) {
  var rect = container.createChild(am4core.Rectangle);
  rect.width = am4core.percent(50);
  rect.height = 50;
  rect.fill = colors.next();
}
As you can see we're setting width of the rectangles to 50% of the Container's width, while we use fixed 50 pixel measurement for the height. Let's see how it affects our rectangle party if we use the "vertical" layout:
See the Pen amCharts 4: Containers (5) by amCharts (@amcharts) on CodePen.
Combining several relative-sized elements
We already know that setting a dimension to a relative value means "Make this element as wide (or tall) as X percent width (or height) of its parent Container".
But what happens if we have several elements in the same Container, sized relatively?
That's where Container's magic kicks in. It will actually try to divvy up all of the Container's available space to all of its relatively sized children.
Whenever there are more than one element sharing a relatively-sized dimension (width or height) the actual percent value becomes indication of how much of the available space should be allocated to that element in comparison to other elements.
For example, if we had an element with its height set to 100% and two elements with their height set to 50%, we would end up with the first element taking up half of the Container's height, while the latter two would share the other half taking 25% of the Container's height each.
Let's see how this works on one of our previous examples if we use relative sizes:
rect.width = am4core.percent(100);
rect.height = am4core.percent(100);
rect.width = am4core.percent(100);
rect.height = am4core.percent(100);
See the Pen amCharts 4: Containers (6) by amCharts (@amcharts) on CodePen.
You'll notice how all of our rectangles take the full width of the Container. That's because they are arranged in a vertical layout, so they don't need to share any of the width with any of the other siblings.
Different story is with the height. Even though each individual rectangle has its height set to 100%, and would take up all of the height of Container if it was alone, they do have siblings with exactly same aspirations, so Container, being a good parent, divvies up all of its available height equally to all six of its children.
Combining fixed and relative-sized elements
We already know how space is being shared between all-relative-sized elements. But what happens when we introduce one or more fixed-sized elements into the mix?
The answer is simple: the fixed-size elements take the exact space they are set to take, while relative-sized elements divvy up the rest.
Not fair? ¯\_(ツ)_/¯
Let's see what happens when we introduce another, fixed-size element into our perfect rectangle harmony. Let's call him a Scrooge McCircle.
let circle = container.createChild(am4core.Circle);
circle.fill = am4core.color("#A1C084");
circle.height = 200;
circle.width = am4core.percent(100);
circle.align = "center";
var circle = container.createChild(am4core.Circle);
circle.fill = am4core.color("#A1C084");
circle.height = 200;
circle.width = am4core.percent(100);
circle.align = "center";
We know that 200 pixels is half of the height of our test Container, which means that McCircle will take up half of the Container, leaving the rest 200 pixels for our rectangles to divide among themselves.
Let's put it to the test:
See the Pen amCharts 4: Containers (7) by amCharts (@amcharts) on CodePen.
Dynamic re-arranging
What's even more cool about Containers, is that they will magically update their layouts when any size-affecting change happens in their children.
For example if we would reduce the height of our fixed-size circle, the rectangles would resize themselves to take up the space that freed up:
See the Pen amCharts 4: Containers (8) by amCharts (@amcharts) on CodePen.
Go ahead. Run the above example.
Excluding elements from layout
There might be situations where we don't want certain element to influence the layout of the Container. We'd position it using manually.
To do so, simply set element's isMeasured = false.
This will effectively makes the element of no concern to Container's layouting mechanism.
Let's see what happens when we do that to McCircle:
See the Pen amCharts 4: Containers (9) by amCharts (@amcharts) on CodePen.
As you can see, rectangles have reclaimed all of the available space, while the circle went behind them. We even had to make rectangles semi-transparent to see the poor circle behind them. That will teach him a lesson!
You also might notice that align property does not work anymore. Container really does not care about how isMeasured = false elements are aligned. We'll see how that can be fixed using element "center" properties in the next section.
Setting element center
All elements in amCharts 4 have their virtual center. An element center is a place which will serve as an anchor point for element's position as defined by its x and y properties.
For most of the elements that's usually a top-left corner.
For some, like a Circle element, that's the center. That's why our circle in the example above appears to be partially "off-screen". It's center is placed at the 0,0 coordinates of the Container.
To set which part of the element is a "center", we use two properties: horizontalCenter and verticalCenter.
| Setting | Available values | Comment |
|---|---|---|
horizontalCenter |
"none", "left", "middle", "right" |
Sets which part of the element is a "horizontal center". |
verticalCenter |
"none", "top", "middle", "bottom" |
Sets which part of the element is a "vertical center". |
So, if we'd like to make our circle to fit nicely into Container, we'd do this:
circle.horizontalCenter = "left";
circle.verticalCenter = "top";
circle.horizontalCenter = "left";
circle.verticalCenter = "top";
This will make its "center" top the top-left corner.
See the Pen amCharts 4: Containers (10) by amCharts (@amcharts) on CodePen.
Absolutely-positioning elements
Once we have element removed from the layout mechanism (or the Container does not have any layout set), we can position the element within its parent Container using x and y properties.
As we learned in the previous section about element's virtual center, setting element's x and y will position it so that its center is exactly over those coordinates.
Using numeric pixel coordinates
We can set x and/or y to a simple numeric value, which means pixels.
The pixel coordinates are relative to parent Container's top-left corner.
Using relative percent coordinates
We can also set coordinates to relative percent values. Those too will be relative to Container's top-left corner, but the actual position will depend on the width and height of the Container.
For example, setting x = am4core.percent(50) will position the element at the center of the Container.
Knowing this, we can rewrite the example from our section about element "center" to achieve exact same results, without changing circle's default center:
circle.x = am4core.percent(50);
circle.y = am4core.percent(50);
circle.x = am4core.percent(50);
circle.y = am4core.percent(50);
Here's a working example of the above if you'd like to take it for a spin.
Element alignment
In some layout types, elements can be aligned horizontally using their align property, or vertically using valign.
Align properties might be a good alternative to using absolute positioning.
| Setting | Available values | Comment |
|---|---|---|
align |
"none", "left", "center", "right" |
Controls elements horizontal alignment within Container. |
valign |
"none", "top", "middle", "bottom" |
Controls elements vertical alignment within Container. |
Ordering elements
Normally, elements are ordered in the same order as they were added to Container.
In layouted Containers, that means that first added element will be drawn first. The next element will come after it. And so on.
The order also important for non-layouted elements (isMeasured = false). The first element will be drawn behind subsequently drawn elements, as we saw in one of our previous examples where circle went behind the rectangles.
Controlling the order of layouted elements
One way to control such order is to use element's toBack() and toFront() methods.
As the names suggest, calling them on the element object will either move it to the beginning of the child list, or to the front of it, which will affect the actual appearance.
let circle = container.createChild(am4core.Circle);
circle.fill = am4core.color("#A1C084");
circle.height = 200;
circle.width = am4core.percent(100);
circle.align = "center";

// Create a container child
let colors = new am4core.ColorSet();
for (let i = 0; i < 6; i++) {
  let rect = container.createChild(am4core.Rectangle);
  rect.width = am4core.percent(100);
  rect.height = am4core.percent(100);
  rect.fill = colors.next();
  rect.fillOpacity = 0.8;
}

circle.toFront();
var circle = container.createChild(am4core.Circle);
circle.fill = am4core.color("#A1C084");
circle.height = 200;
circle.width = am4core.percent(100);
circle.align = "center";

// Create a container child
var colors = new am4core.ColorSet();
for (var i = 0; i < 6; i++) {
  let rect = container.createChild(am4core.Rectangle);
  rect.width = am4core.percent(100);
  rect.height = am4core.percent(100);
  rect.fill = colors.next();
  rect.fillOpacity = 0.8;
}

circle.toFront();
Notice how we're calling toFront() only after all rectangles are added. If we'd do that before, it would have no affect, because our list of children would not yet be complete.
Here's how this particular call changes the layout:
See the Pen amCharts 4: Containers (12) by amCharts (@amcharts) on CodePen.
We still have circle occupying half of the Container, but it now goes after the rectangles.
Using zIndex to control order of non-layouted elements
Once elements are removed from layout (or Container does not have a layout), they are slapped over each other, with the older elements ending up behind newer ones.
Just like in HTML/CSS, we can control it using zIndex property.
It's quite simple: elements with higher zIndex will end up over elements with lower zIndex, regardless of their actual order.
So, if we want to bring the circle from one of our previous examples in front of rectangles, we can set its zIndex to any number above zero:
See the Pen amCharts 4: Containers (13) by amCharts (@amcharts) on CodePen.
Advanced usage
Styling containers
Normally, a Container is a silent controller of the layout. However, in some cases you might want to apply some styling to it, like adding an outline or a background color.
For that, every Container instance is fitted with a property background, which holds a functional Rectangle instance.
By default it's invisible. We can make it visible and configure its various settings to act as an actual background/outline for our Container.
let container = am4core.create("container", am4core.Container);
container.width = am4core.percent(100);
container.height = am4core.percent(100);
container.background.fill = am4core.color("#000");
container.background.fillOpacity = 0.1;
container.background.stroke = am4core.color("#000");
container.background.strokeOpacity = 0.2;
container.background.strokeWidth = 2;
var container = am4core.create("container", am4core.Container);
container.width = am4core.percent(100); container.height = am4core.percent(100);
container.background.fill = am4core.color("#000");
container.background.fillOpacity = 0.1;
container.background.stroke = am4core.color("#000");
container.background.strokeOpacity = 0.2;
container.background.strokeWidth = 2;
var container = am4core.createFromConfig({
  "width": "100%",
  "height": "100%",
  "background": {
    "fill": "#000",
    "fillOpacity": 0.1,
    "stroke": "#000",
    "strokeOpacity": 0.2,
    "strokeWdith": 2
  }
}, "container", am4core.Container);
See the Pen amCharts 4: Containers (14) by amCharts (@amcharts) on CodePen.
Adding charts to containers
Adding charts to a Container is as straightforward as adding rectangles. They will be sized, positioned and arranged automatically.
The charts are created like any regular chart, except we are going to be using Container's createChild() method to create a chart instance, instead of create() or createFromConfig().
Let's see this in an example:
See the Pen amCharts 4: Containers (charts) by amCharts (@amcharts) on CodePen.
Nesting containers
As we mentioned early into this article, Containers can contain other Containers.
Container will apply the same sizing mechanisms to its child Containers, just like with simple elements.
This means that you can create complex nested layouts.
Without further back and forth, we're going to just drop a working example:
See the Pen amCharts 4: Containers (nesting containers) by amCharts (@amcharts) on CodePen.
If you take a look at the code of the above example, you'll notice that our topmost Container has "horizontal" layout.
We add two additional Containers to it: one for buttons and the other for charts. Since the layout is "horizontal" they are put next to each other.
Buttons Container has its width set at fixed 200 pixels. Charts Container has a relative width, which means that it will take up all of the width that is left over from Buttons.
Both of the child containers have layout set to "vertical", so when we start adding elements to them - buttons and charts - they will be arranged vertically.
Notice, how we also applied align setting to buttons, as well as added topMargin so they are spaced out.
Pre-defined chart containers
As we mentioned briefly in the beginning of this article, charts have a lot of pre-defined containers you can access and use to add stuff to.
Let's explore them.
The following diagram shows hierarchy and layout of the most complex (container-wise) chart - XY chart.
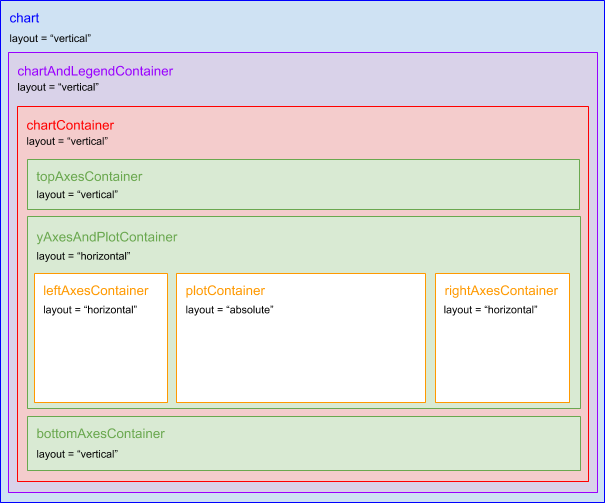
The "names" of the container is actually a chart property they are accessible by. E.g. chart.leftAxesContainer.
NOTE Please note that sizing and padding of the containers in the above diagram is purely schematic. The chart will size and position those containers based on settings and content.
There's also a special container - tooltipContainer - which covers the whole of the chart area, has no layout, and thus can be used all kind of stuff you need to position globally within chart area:
