amCharts 4 brings the whole arsenal of tools to help you deal with all aspects of coloring things, like color sets, gradients, modifiers, contrast, and so on. This article will explain all of them.
Setting colors
Creating color object
When creating charts, you will most definitely at some point will need to specify a color of something.
Most often that's a color of some shape's fill (represented by fill property) or outline (stroke).
A color in amCharts 4 is represented by an object of type Color.
While you're welcome to instantiate color objects using new notation, it's much more quicker to just use built-in handy function: am4core.color(color).
Whatever you'll throw at it, it will try to convert it into a proper Color object. The following types accepted:
| Type | Example |
|---|---|
| Hex code | "#FF0000" |
| Short hex code | "#F00" |
| Named color | "red" |
An rgb() string |
"rgb(255, 0, 0)" |
An rgba() string |
"rgba(255, 0, 0, 1)" |
An iRGB object |
{ r: 255, g: 0, b: 0 } |
Let's create a simple rectangle, and fill it green, with a red outline:
let rect = container.createChild(am4core.Rectangle);
rect.width = 100;
rect.height = 100;
rect.align = "center";
rect.valign = "middle";
rect.strokeWidth = 3;
rect.fill = am4core.color("green");
rect.stroke = am4core.color("red");
var rect = container.createChild(am4core.Rectangle);
rect.width = 100;
rect.height = 100;
rect.align = "center";
rect.valign = "middle";
rect.strokeWidth = 3;
rect.fill = am4core.color("green");
rect.stroke = am4core.color("red");
{
  // ...
  "children": [{
    "type": "Rectangle",
    "width": 100,
    "height": 100,
    "align": "center",
    "valign": "middle",
    "strokeWidth": 3,
    "fill": "green",
    "stroke": "red"
  }]
}
NOTE IN JSON-based config you can skip the color() function and just use a string representation.
Let's see how this looks:
See the Pen amCharts 4: Colors (1) by amCharts (@amcharts) on CodePen.
Manipulating color
Besides representing static color Color object can also create derivative complementing colors.
For example, we can generate a lightened version of the color by calling its ligthen() method.
The following methods are available:
| Method | Values | Description |
|---|---|---|
brighten(value) |
-1 to 1 |
Returns a new Color that is brighter (positive value) or less bright (negative value) than the original color. |
lighten(value) |
-1 to 1 |
Returns a new Color that is lighter (positive value) or darker (negative value) than the original color. |
saturate(value) |
0 to 1 |
Returns a new Color that is a fully (0) or partially de-saturated version of the original color. |
NOTE The difference between "brightness" and "lightness" is subtle. Use whichever produces best results for you.
Let's try that on our previous example:
rect.fill = am4core.color("red").lighten(0.5);
rect.stroke = am4core.color("red").lighten(-0.5);
rect.fill = am4core.color("red").lighten(0.5);
rect.stroke = am4core.color("red").lighten(-0.5);
{
  // ...
  "children": [{
    // ...
    "fill": am4core.color("red").lighten(0.5),
    "stroke": am4core.color("red").lighten(-0.5)
  }]
}
We're using "red" for both fill and stroke, except fill is lightened by 50% and outline is darkened by 50%:
See the Pen amCharts 4: Colors (2) by amCharts (@amcharts) on CodePen.
Getting contrasting color
Sometimes you need put elements over each other. Like for instance a label over a button.
In such cases you need to make sure that they are using contrasting colors. You can choose the colors for yourself, or you get one from Color object's alternative property.
It will return a new Color object that is guaranteed to contrast and be visible over the original color.
label.fill = rect.fill.alternative;
label2.fill = rect2.fill.alternative;
label.fill = rect.fill.alternative;
label2.fill = rect2.fill.alternative;
NOTE The above doesn't work well with JSON-based setups.
As you can see, we're setting first label's fill to the alternative color of the first rectangle. Similarly, we do for the second rectangle-label duo.
Since the the first rectangle is filled with a light color, it chooses black as the contrasting color for the label. The second one is quite dark, which means white label goes better over it:
See the Pen amCharts 4: Colors (3) by amCharts (@amcharts) on CodePen.
Colors and text
When setting colors to text, the natural instinct might suggest using stroke method. That, in fact, will set the color of the text outline. To set color of the text, use fill.
Color sets
What is a color set?
When creating charts, most of the time, just using a few colors won't be enough. That's where color sets come in.
A color set is an object of type ColorSet which serves the following functionality:
- Serves a new color whenever asked to;
- Generates new colors based on set rules.
Charts use color sets all the time. For example, Pie chart creates a color set, then asks for a new color from it every time it needs to set one on a new slice.
Similarly, XY chart uses a color set to apply a new color for each of its series.
Using color set
To use a color set, instantiate it from ColorSet class, then access its methods and properties.
The most obvious is next(). Every time you call it, it will return a new color that is relative to this set.
Let's modify our code to generate a bunch of squares, using a color set and its next() method to assign different colors:
let colorSet = new am4core.ColorSet();
for(let i = 0; i < 8; i++) {
  let rect = container.createChild(am4core.Rectangle);
  rect.width = 100;
  rect.height = 100;
  rect.fill = colorSet.next();
}
var colorSet = new am4core.ColorSet();
for(var i = 0; i < 8; i++) {
  var rect = container.createChild(am4core.Rectangle);
  rect.width = 100;
  rect.height = 100;
  rect.fill = colorSet.next();
}
See the Pen amCharts 4: Colors (4) by amCharts (@amcharts) on CodePen.
Should you want to "restart" the color set, you can call its reset() method.
MORE INFO In order not to overcrowd this article, we're not going to mention other properties of the color sets here. Make sure you check ColorSet class reference (name linked) for other properties.
Relation to themes
Color sets usually come with a pre-set list of colors. If you want to access that list, you can get it from set's list property.
Using themes will affect this default list of colors.
This is how our test case looks like with various themes:
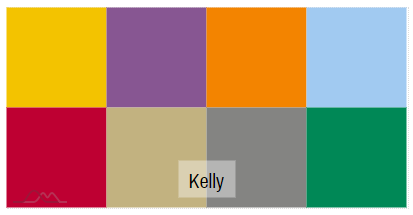
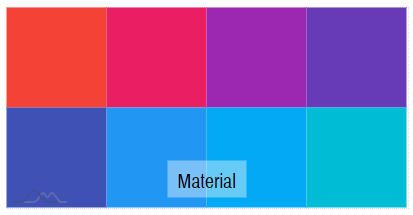

MORE INFO For more about using themes in amCharts 4, check out our "Themes" article.
Manually setting color sets
If you can't find a ready-made theme that suits your needs, and creating your own theme is not an option, you can specify a list of colors to be used for your chart directly.
Depending on chart type, different color lists are used.
XY Chart and derivative charts
On these charts, each series receives a new color from the chart's main ColorSet, accessible via its colors property.
So, to modify the colors, assigned to each series added, we just need to modify chart's color set, which can be done via its list property:
chart.colors.list = [
  am4core.color("#845EC2"),
  am4core.color("#D65DB1"),
  am4core.color("#FF6F91"),
  am4core.color("#FF9671"),
  am4core.color("#FFC75F"),
  am4core.color("#F9F871")
];
chart.colors.list = [
  am4core.color("#845EC2"),
  am4core.color("#D65DB1"),
  am4core.color("#FF6F91"),
  am4core.color("#FF9671"),
  am4core.color("#FFC75F"),
  am4core.color("#F9F871")
];
{
  // ...
  "colors": {
    "list": [
      "#845EC2",
      "#D65DB1",
      "#FF6F91",
      "#FF9671",
      "#FFC75F",
      "#F9F871"
    ]
  }
}
IMPORTANT Please note: as color is being assigned to series at the moment when it is added to chart, color list must be set before we add our series, or it will have no effect.
See the Pen amCharts 4: Modifying color sets (1) by amCharts (@amcharts) on CodePen.
Pie and similar sliced charts
Pie and similar sliced charts, like Funnel, Pyramid, and Pictogram, while still having series, do not assign colors directly to them. They rather use color sets to assign an individual color to each its item - Slice.
For these charts, chart-wide colors is not used. Each series uses own colors property, which works exactly like explained before. You just use series' colors:
pieSeries.colors.list = [
  am4core.color("#845EC2"),
  am4core.color("#D65DB1"),
  am4core.color("#FF6F91"),
  am4core.color("#FF9671"),
  am4core.color("#FFC75F"),
  am4core.color("#F9F871"),
];
pieSeries.colors.list = [
  am4core.color("#845EC2"),
  am4core.color("#D65DB1"),
  am4core.color("#FF6F91"),
  am4core.color("#FF9671"),
  am4core.color("#FFC75F"),
  am4core.color("#F9F871"),
];
{
  // ...
  "series": [{
    // ...
    "colors": {
      "list": [
        "#845EC2",
        "#D65DB1",
        "#FF6F91",
        "#FF9671",
        "#FFC75F",
        "#F9F871"
      ]
    }
  }]
}
See the Pen amCharts 4: Modifying color sets (2) by amCharts (@amcharts) on CodePen.
Interface colors
amCharts 4 has a special color set that is used to color various interface elements, like buttons, scrollbars, etc.
It is represented by an object of type InterfaceColorSet.
Normally, this is used by the charting engine. However, there's nothing standing between you and it, so you can use it to get colors suitable for various elements.
To start using it, simply instantiate an object. To get a color meant for a specific purpose, use set's getFor(purpose) method.
The purposes are defined in IColorPurpose interface.
As with regular color sets, interface ones are set up by the themes. Theme author ensures, that interface elements, like buttons, will go well with the rest of the theme.
Gradients
So far we have been using solid colors.
Let's step up our game and try something funkier.
Standard gradients
Creating gradient
The fill property of the most of the elements besides Color objects, can also accept a gradient object.
There are a couple of gradient classes built-into amCharts 4 core: LinearGradient and RadialGradient.
Setting a fill to some gradient is a two-step process:
- Instantiating a gradient object;
- Adding color steps.
Let's try adding a simple LinearGradient to our rectangle from before:
let gradient = new am4core.LinearGradient();
gradient.addColor(am4core.color("red"));
gradient.addColor(am4core.color("blue"));
rect.fill = gradient;
var gradient = new am4core.LinearGradient();
gradient.addColor(am4core.color("red"));
gradient.addColor(am4core.color("blue"));
rect.fill = gradient;
{
  // ...
  "children": [{
    "type": "Rectangle",
    // ...
    "fill": {
      "type": "LinearGradient",
      "stops": [{
        "color": "red"
      }, {
        "color": "blue"
      }]
    }
  }]
}
As expected, this will create a simple gradient from red to blue:
See the Pen amCharts 4: Gradients (1) by amCharts (@amcharts) on CodePen.
Using multiple colors
Gradient is not limited to just two colors. You can add as many as you like:
let gradient = new am4core.LinearGradient();
gradient.addColor(am4core.color("red"));
gradient.addColor(am4core.color("blue"));
gradient.addColor(am4core.color("green"));
gradient.addColor(am4core.color("yellow"));
gradient.addColor(am4core.color("red"));
rect.fill = gradient;
var gradient = new am4core.LinearGradient();
gradient.addColor(am4core.color("red"));
gradient.addColor(am4core.color("blue"));
gradient.addColor(am4core.color("green"));
gradient.addColor(am4core.color("yellow"));
gradient.addColor(am4core.color("red"));
rect.fill = gradient;
{
  // ...
  "children": [{
    "type": "Rectangle",
    // ...
    "fill": {
      "type": "LinearGradient",
      "stops": [{
        "color": "red"
      }, {
        "color": "blue"
      }, {
        "color": "green"
      }, {
        "color": "yellow"
      }, {
        "color": "red"
      }]
    }
  }]
}
See the Pen amCharts 4: Gradients (1) by amCharts (@amcharts) on CodePen.
Setting direction
A linear gradient direction is set using its rotation property. Its set using degrees (0-360).
By default rotation is zero, which means horizontal gradient. To make it vertical, set to 90.
You can also set it to any value between 0 and 360, to create gradients at any angle:
See the Pen amCharts 4: Gradients (3) by amCharts (@amcharts) on CodePen.
Radial gradients
Radial gradients work similarly to linear one, except you create an instance of RadialGradient.
let gradient = new am4core.RadialGradient();
gradient.addColor(am4core.color("red"));
gradient.addColor(am4core.color("blue"));
gradient.addColor(am4core.color("green"));
gradient.addColor(am4core.color("yellow"));
gradient.addColor(am4core.color("red"));
rect.fill = gradient;
var gradient = new am4core.RadialGradient();
gradient.addColor(am4core.color("red"));
gradient.addColor(am4core.color("blue"));
gradient.addColor(am4core.color("green"));
gradient.addColor(am4core.color("yellow"));
gradient.addColor(am4core.color("red"));
rect.fill = gradient;
{
  // ...
  "children": [{
    "type": "Rectangle",
    // ...
    "fill": {
      "type": "RadialGradient",
      "stops": [{
        "color": "red"
      }, {
        "color": "blue"
      }, {
        "color": "green"
      }, {
        "color": "yellow"
      }, {
        "color": "red"
      }]
    }
  }]
}
See the Pen amCharts 4: Gradients (4) by amCharts (@amcharts) on CodePen.
As linear gradient has rotation, radial gradient has a few specific settings up its sleeve, too.
By default, the center of the radial's ripples go from the center of the element. You can change that using cx and xy settings.
The following will put the center of the radial, to the lower-left corner:
gradient.cx = am4core.percent(0);
gradient.cy = am4core.percent(100);
gradient.cx = am4core.percent(0);
gradient.cy = am4core.percent(100);
{
  // ...
  "children": [{
    "type": "Rectangle",
    // ...
    "fill": {
      "type": "RadialGradient",
      // ...
      "cx": "0%",
      "cy": "100%"
    }
  }]
}
Color modifiers
What are modifiers?
In gradients we were playing with a list of colors, transiting from one to another gradually.
A color modifier is a way to create gradients out of a single fill color.
For now there are two types of color modifiers supported: LinearGradientModifier which creates linear gradients, and RadialGradientModifier used to create radial gradients.
Modifier works by defining a list of "steps". Each step has a position (break point) defined as a relative value (0-1) indicating its position withing element we're trying to decorate.
Each can also define one of the following properties of the fill color: lightness, brightness, or opacity.
When applied to an element, it will gradually transition between steps, creating a custom gradient.
There are 4 essential properties associated with the linear modifier:
All of those are arrays. Each item in these is a value that should be applied to each step in our custom gradient.
offsets defines where, relatively to the whole width of the element, this step resides. The position is a relative value with 0 being start and 1 being end.
E.g. [0, 0.5, 1] means that the first step is at the beginning, the second right in the middle, with the third one residing at the end.
The rest of those arrays are values that will be used to generate a derived color for that step.
Remember where we talked about manipulating color earlier in this article? This is basically it.
Say, we set [-0.5, 1, -0.5] as brightnesses. This basically means for the first step take our fill color ant call brightness(-0.5) on it, effectively darkening it.
OK, so here's the example:
let fillModifier = new am4core.LinearGradientModifier();
fillModifier.brightnesses = [-0.8, 1, -0.8];
fillModifier.offsets = [0, 0.5, 1];
rect.fillModifier = fillModifier;
var fillModifier = new am4core.LinearGradientModifier();
fillModifier.brightnesses = [-0.8, 1, -0.8];
fillModifier.offsets = [0, 0.5, 1];
rect.fillModifier = fillModifier;
{
  // ...
  "children": [{
    "type": "Rectangle",
    // ...
    "fillModifier": {
      "type": "LinearGradientModifier",
      "brightnesses": [-0.8, 1, -0.8],
      "offsets": [0, 0.5, 1]
    }
  }]
}
This will effectively create a gradient with a red color darkened by 80% on the left, with untouched solid color right in the middle, with going back to 80% darkened red on the right.
See the Pen amCharts 4: Color modifiers by amCharts (@amcharts) on CodePen.
NOTE Just to make it super clear: anything you can do with modifiers you can do with regular gradients. They are just a helper class that allows automatically generate gradients according to some rules, saving you the trouble of defining all steps for gradients manually. In fact, modifier generates an actual gradient and stores it in its gradient property.
Working with opacities
Now, let's try something else. Let's make fill of our element fade out to complete transparency next to its edges.
For that we'll use opacities:
let fillModifier = new am4core.LinearGradientModifier();
fillModifier.opacities = [0, 1, 1, 1, 0];
fillModifier.offsets = [0, 0.2, 0.5, 0.8, 1];
rect.fillModifier = fillModifier;
var fillModifier = new am4core.LinearGradientModifier();
fillModifier.opacities = [0, 1, 1, 1, 0];
fillModifier.offsets = [0, 0.2, 0.5, 0.8, 1];
rect.fillModifier = fillModifier;
{
  // ...
  "children": [{
    "type": "Rectangle",
    // ...
    "fill": {
      "type": "LinearGradientModifier",
      "opacities": [0, 1, 1, 1, 0],
      "offsets": [0, 0.2, 0.5, 0.8, 1]
    }
  }]
}
See the Pen amCharts 4: Color modifiers (2) by amCharts (@amcharts) on CodePen.
Rotating modifier-generated gradients
As we mentioned before, modifier stores actual gradient object in its gradient property, which means you can access it to set the rotation, like with regular gradient:
fillModifier.gradient.rotation = 90;
fillModifier.gradient.rotation = 90;
{
  // ...
  "children": [{
    "type": "Rectangle",
    // ...
    "fill": {
      "type": "LinearGradientModifier",
      // ...
      "gradient": {
        "rotation": 90
      }
    }
  }]
}
Usage in charts
So far we have been dealing with abstract shapes in this article.
To drive this home, let's apply some of the principles to a real chart.
What about an area chart with gradually fading out fill?
let lineSeries = chart.series.push(new am4charts.LineSeries());
// ...
lineSeries.fillOpacity = 1;

let fillModifier = new am4core.LinearGradientModifier();
fillModifier.opacities = [1, 0];
fillModifier.offsets = [0, 1];
fillModifier.gradient.rotation = 90;
lineSeries.segments.template.fillModifier = fillModifier;
var lineSeries = chart.series.push(new am4charts.LineSeries());
// ...
lineSeries.fillOpacity = 1;

var fillModifier = new am4core.LinearGradientModifier();
fillModifier.opacities = [1, 0];
fillModifier.offsets = [0, 1];
fillModifier.gradient.rotation = 90;
lineSeries.segments.template.fillModifier = fillModifier;
{
  // ...
  "series": [{
    "type": "LineSeries",
    // ...
    "fillOpacity": 1,
    "segments": {
      "fillModifier": {
        "type": "LinearGradientModifier",
        "opacities": [1, 0],
        "offsets": [0, 1],
        "gradient": {
          "rotation": 90
        }
      }
    }
  }]
}
See the Pen amCharts V4: Using color modifiers (1) by amCharts (@amcharts) on CodePen.
How about creating a round bar effect?
See the Pen amCharts V4: Using color modifiers (2) by amCharts (@amcharts) on CodePen.
Or a shiny round donut using RadialGradientModifier?
See the Pen amCharts 4: Radial gradient modifier by amCharts (@amcharts) on CodePen.
Patterns
Besides gradient fills, amCharts 4 also supports patterned fills.
As with gradients, pattern can be assigned to a fill property of virtually any element.
Let's see how patterns are created.
Creating a pattern
To create a pattern we have a predictably named class Pattern. First, we'll need to instantiate it.
var pattern = new am4core.Pattern();
var pattern = new am4core.Pattern();
{
  // ...
  "children": [{
    "type": "Rectangle",
    // ...
    "fill": {
      "type": "Pattern"
    }
  }]
}
Adding pattern elements
Of course, the code above will do nothing, since there's no actual visual elements in the pattern.
We have to add some.
To add an element to a pattern, we need to use its addElement(element) method.
IMPORTANT The element that needs to be passed into addElement() is not an instance of Sprite but rather AMElement which is a low-level representation, of an actual SVG node. You can access Sprite's element using its element property.
OK, so let's create an instance of Image that can be used to populate our pattern, then add it to pattern.
var image = new am4core.Image();
image.href = "data:image/svg+xml;charset=utf-8;base64,PHN2ZyB2ZXJzaW9uPSIxIiB2aWV3Qm94PSIwIDAgNjEyIDc5MiIgeG1sbnM9Imh0dHA6Ly93d3cudzMub3JnLzIwMDAvc3ZnIj48cGF0aCBmaWxsPSIjZmNhZjE3IiBkPSJNMzA2IDE1M2wtOTAgMTQ2LTE2NiA0MCAxMTEgMTMwLTEzIDE3MSAxNTgtNjUgMTU4IDY1LTEzLTE3MSAxMTEtMTMwLTE2Ni00MC05MC0xNDZ6Ii8+PC9zdmc+";
image.width = 15;
image.height = 20;
pattern.addElement(image.element);
{
  // ...
  "children": [{
    "type": "Rectangle",
    // ...
    "fill": {
      "type": "Pattern",
      "elements": [{
        "type": "Image",
        "typeProperty": "element",
        "href": "data:image/svg+xml;charset=utf-8;base64,PHN2ZyB2ZXJzaW9uPSIxIiB2aWV3Qm94PSIwIDAgNjEyIDc5MiIgeG1sbnM9Imh0dHA6Ly93d3cudzMub3JnLzIwMDAvc3ZnIj48cGF0aCBmaWxsPSIjZmNhZjE3IiBkPSJNMzA2IDE1M2wtOTAgMTQ2LTE2NiA0MCAxMTEgMTMwLTEzIDE3MSAxNTgtNjUgMTU4IDY1LTEzLTE3MSAxMTEtMTMwLTE2Ni00MC05MC0xNDZ6Ii8+PC9zdmc+",
        "width": 15,
        "height": 20
      }]
    }
  }]
}
NOTE We are using a Base64-encoded version of an SVG image of a star as a "Data URL", which is a way to embed images. If we wanted we could use a standard URL here as well.
NOTE ABOUT JSON In JSON-based configs, besides of the type of the element, we also set typeProperty, so that JSON parser knows which property from the newly created element to take and add as an element, because it can't use Sprite directly.
Setting pattern sizes
There are several places where we might need to set the size when creating patterns.
Sizing pattern elements
We already saw a code for setting a width and height to our Image element. This is important so that we can size the element as we want it to appear in a pattern.
Sizing pattern itself
Another width and height we need to set is to a pattern itself.
If we set dimensions to the same of the image, we will have a grid of images laid out closely side-by-side.
If we use smaller dimensions, our images will be cropped accordingly.
Finally, if we use bigger dimensions, images will be spaced out.
Let's try same dimensions for now:
var pattern = new am4core.Pattern();
pattern.width = 15;
pattern.height = 20;
var pattern = new am4core.Pattern();
pattern.width = 15;
pattern.height = 20;
{
  // ...
  "children": [{
    "type": "Rectangle",
    // ...
    "fill": {
      "type": "Pattern",
      "width": 15,
      "height": 20,
      // ...
    }
  }]
}
Using pattern as a fill
Now that we have it all set up, let's use it as fill value for our rectangle:
rect.fill = pattern;
rect.fill = pattern;
{
  // ...
  "children": [{
    "type": "Rectangle",
    // ...
    "fill": {
      "type": "Pattern",
      "width": 15,
      "height": 20,
      "elements": [{
        "type": "Image",
        "href": "data:image/svg+xml;charset=utf-8;base64,PHN2ZyB2ZXJzaW9uPSIxIiB2aWV3Qm94PSIwIDAgNjEyIDc5MiIgeG1sbnM9Imh0dHA6Ly93d3cudzMub3JnLzIwMDAvc3ZnIj48cGF0aCBmaWxsPSIjZmNhZjE3IiBkPSJNMzA2IDE1M2wtOTAgMTQ2LTE2NiA0MCAxMTEgMTMwLTEzIDE3MSAxNTgtNjUgMTU4IDY1LTEzLTE3MSAxMTEtMTMwLTE2Ni00MC05MC0xNDZ6Ii8+PC9zdmc+",
        "width": 15,
        "height": 20
      }]
    }
  }]
}
Let's see how it looks like now:
See the Pen amCharts 4: Patterns (1) by amCharts (@amcharts) on CodePen.
Awwwww, cute. Isn't it?
Built-in patterns
amCharts 4 has two built-in patterns you can use right off the bat, without requiring to include images: LinePattern and RectPattern.
Those are used to fill things with either lines, or rectangles, respectively.
In all aspects those are regular patterns, except they come with either line or rectangle elements pre-added, so you don't have to add it.
Say we want to fill our rectangle with tiny spaced out squares. We can do so by creating a RectPattern:
let pattern = new am4core.RectPattern();
pattern.rectWidth = 5;
pattern.rectHeight = 5;
pattern.width = 10;
pattern.height = 10;
pattern.fill = am4core.color("red").lighten(0.5);
pattern.strokeWidth = 0;
var pattern = new am4core.RectPattern();
pattern.rectWidth = 5;
pattern.rectHeight = 5;
pattern.width = 10;
pattern.height = 10;
pattern.fill = am4core.color("red").lighten(0.5);
pattern.strokeWidth = 0;
{
  // ...
  "children": [{
    "type": "Rectangle",
    // ...
    "fill": {
      "type": "RectPattern",
      "rectWidth": 5,
      "rectHeight", 5,
      "width": 10,
      "height": 10,
      "fill": "red",
      "strokeWidth": 0
    }
  }]
}
NOTE #1 The rectWidth and rectHeight control the width and height of the rectangle elements. Same as we were setting them on our image in previous examples.
NOTE #2 Note how we set the color for fill elements using fill directly on pattern. We also disable outline using strokeWidth = 0.
Let's try that on a live example:
See the Pen amCharts 4: Patterns (2) by amCharts (@amcharts) on CodePen.
LinePattern works in a similar way, except there's no rectWidth or rectHeight, obviously.
The lines in pattern will be as long as pattern's width and/or height. The line's thickness is determined by strokeWidth.
let pattern = new am4core.LinePattern();
pattern.width = 10;
pattern.height = 10;
pattern.stroke = am4core.color("red").lighten(0.5);
pattern.strokeWidth = 2;
pattern.rotation = 45;
var pattern = new am4core.LinePattern();
pattern.width = 10;
pattern.height = 10;
pattern.stroke = am4core.color("red").lighten(0.5);
pattern.strokeWidth = 2;
pattern.rotation = 45;
{
  // ...
  "children": [{
    "type": "Rectangle",
    // ...
    "fill": {
      "type": "LinePattern",
      "width": 10,
      "height": 10,
      "strokeWidth": "red",
      "rotation": 45
    }
  }]
}
Notice the rotation in code above? This will predictable rotate the pattern lines to specific angle.
See the Pen amCharts 4: Patterns (3) by amCharts (@amcharts) on CodePen.
NOTE Please note that when you have lines thicker than 1 pixel, the ending of the line is rounded, which might make the pattern seem like non-continuous lines. There's no work around for that. To produce different patterns, you would need to create a regular Pattern then add Line elements to it to have more control.
Patterns in a chart
Now that we learned patterns, let's try them on a chart.
To make it interesting, let's make each column in a column chart to fill using different line pattern color for each bar.
See the Pen amCharts V4: Patterns (5) by amCharts (@amcharts) on CodePen.
Patterns in a map
One final example and we'll let you go.
This time we'll use map polygon's adapter to check data for special information about a country, and override fill with a dynamically-generated pattern:
See the Pen amCharts 4: Selectively filling countries with patterns on a map by amCharts (@amcharts) on CodePen.
Patterns theme
amCharts 4 comes with a "patterns" theme, that can be used to automatically apply patterned fills to chart elements like slices, columns, and area series.
For more info, read here.
Pattern sets
At the beginning of this article we introduced to the concept of Color sets. A color set is an object able to iterate colors, even generate new ones, that are used by charts and their components whenever something needs distinctive coloring, such as slices of a Pie chart, series of an XY chart, etc.
Pattern sets work similarly. While they are not able to generate new patterns (yet), they can be used to iterate through a list of pre-defined, or custom lists of various patterns, that can be used instead of solid color fills for various objects.
Creating pattern sets
Patterns sets are represented by objects of type PatternSet. We can instantiate it just like any other object:
let patterns = new am4core.PatternSet();
var patterns = new am4core.PatternSet();
Once we have a Pattern set object, we can grab new patterns either via next() or getIndex() methods - just like with Color sets.
Those will return an object of type Pattern which can be used interchangeably with Color objects, for setting fill and stroke properties of the objects.
Applying patterns automatically
Some chart elements have patterns property. It means they support Pattern sets. If you set those with an instance of the PatternSet they will apply patterned fills automatically, without further configuration.
Examples of such objects that support Pattern sets are: XYChart (it will automatically feed pattern fills to its objects) and PercentSeries (it will use patterns as fills for each of its slices).
Let's see how this works on a PieSeries for example.
pieSeries.patterns = new am4core.PatternSet();
pieSeries.patterns = new am4core.PatternSet();
{
  // ...
  "series": [{
    // ...
    "patterns": {
      "type": "PatternSet"
    }
  }]
}
Now, if we run such Pie hart, we'll get patterns for slice fills instead of solid colors:
See the Pen amCharts 4: Using PatternSet by amCharts team (@amcharts) on CodePen.
NOTE In fact, that's exactly what "patterns" theme, discussed earlier in this article is doing.
Using pattern sets manually
For elements that do not support automatic usage of Pattern sets, we can apply them using manual application methods, i.e. via data and property fields.
Let's build a patterned continents map that uses Pattern set to set custom fills via data.
See the Pen amChrts 4: PatternSet on MapChart by amCharts team (@amcharts) on CodePen.
Modifying pattern lists
Pattern set comes with a list of pre-defined patterns you can use right away.
That does not limit us to create our own pattern lists. It's as easy as replacing Pattern set's list property with an array populated by our own Pattern objects.
patterns.list = [
  new am4core.LinePattern(),
  new am4core.RectPattern()
];
patterns.list = [
  new am4core.LinePattern(),
  new am4core.RectPattern()
];
